
Lavender Wands
When we were planning our new backyard several years ago, the designer said, "So I hear you want lavender. How many plants?" I told her, when you think you have too many, add five more and you'll have made a good start.
To my mind, you can't have too much lavender. The waving fields of it in Provence are my idea of heaven. The question is, once you've got all this lavender, what do you do with it? One answer is, make lavender wands. These are pretty, functional items that are fun to make, are great gifts, and leave your hands smelling terrific to boot when you finish making them.
What you'll need
- Fresh lavender spikes: Cut lavender early in the day when most of the flowers on the spike are still closed but aromatic. Leave a good length of stalk; you can always trim it later and it's much better to have too much stalk than not enough.
My favorite variety of lavender for scent uses is Provence. It's a big blowsy plant with long spikes with an extremely strong scent. You can use other varieties like Hidcote, but you won't see the more decorative flowers and the scent won't be as strong. DRIED LAVENDER WILL NOT WORK FOR LAVENDER WANDS. Nuff said.
- 1/8th inch wide satin ribbon: Does have to be cloth, not paper; doesn't have to be expensive. I buy it by the reel when it goes on sale. Darker colors tend to work better than lighter ones; the stalks "bleed" green a bit and can discolor pale ribbons. Bright reds and blues make particularly pretty wands, but maybe that's just because I'm partial to red and blue ribbons.
- Scissors
Method![[lav1 graphic]](/sites/default/files/lav1.jpg)
FIRST: You need at least eleven spikes per wand; you can make bigger wands by just adding more spikes, keeping the total number of spikes an odd number. Take your odd-numbered bundle of lavender spikes and strip off any clusters of flowers lower on the spike than the main cluster of flowers on each spike. With the ribbon, tie the bunch tightly at the base of the flowers with a square knot, leaving 12 to 18 inches of ribbon on one end and NOT cutting the other end from the reel of ribbon.
![[lav2 graphic]](/sites/default/files/lav2.jpg)
NEXT: Verrry carefully fold the stalks of each spike down over the tied bunch of flowers (see photo, left). If you look at the finished wand, you'll understand immediately what we're trying to do here--enclose the flowers inside the stalks. Let the tail of ribbon fall down inside the enclosing stalks with the flower heads; keep the ribbon still attached to the reel on the outside.
![[lav3 graphic]](/sites/default/files/lav3.jpg)
THEN: Start weaving the ribbon through the stalks--over one, under the next and so on--with the end of the ribbon still attached to the reel. Keep the weaving tight. The object is to completely enclose the flower heads; as the stalks dry later on, your weaving will become looser, so right now you want to keep things very firm and tight. Keep weaving over one, under one, round and round, until you have completely enclosed the flower heads and the stalks come together in a tight bunch.
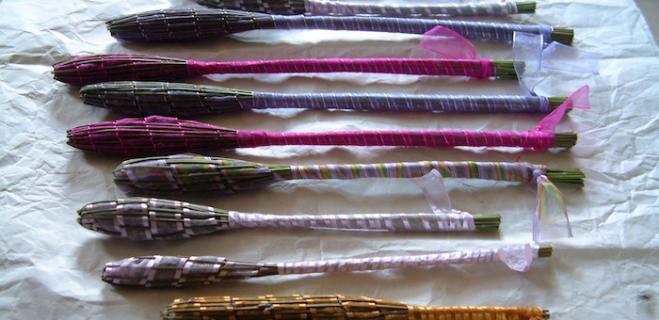
TO FINISH: Wind the weaving ribbon around the bundle of stalks once or twice. Take up the tail you left at the beginning and use it with the weaving end to make a tight square knot. Wind both ends around the bundle to hide the knot and then tie them in a bow. You're done!
Once made, the wands can perfume your linens, your lingerie, any closet or drawer or even your car. The scent lasts a long time; when it starts to fade, just squeeze the wand and it will renew. I have decade-old wands I wove when I first learned how to make them that still smell pretty darn good.
Lynn Siprelle smells FABULOUS.