Making Whole Wheat Bread, Part Two

Measuring and mixing ingredients is a major part of any recipe. But what makes bread-making different is how you work them together. Whole wheat breads create an additional problem because, well, they're harder to work with than white flour breads.
It's all in the kneading
If you read Laurel's Kitchen Bread Book by Laurel Robertson, she will tell you that you have to knead whole wheat bread doughs a very long time to get them properly kneaded--like half an hour. And while some may see that as an excellent way to get an upper body workout, I don't. And I don't have that kind of time to put into one part of bread making. So I use a stand mixer.
Bear in mind, though, most manufacturers of mixers will warn you that you can't mix them for very long in their machines. Whole grain bread dough is pretty tough. But don't let that stop you. Pay attention to what is happening, add enough flour to keep the dough from sticking, and you should do fine.
It's important not to add too much flour, though, as that compounds the problem and makes an even tougher dough. I check this by stopping the mixer and poking the dough with my finger. I want it to feel a little sticky but I don't want any dough to stick to my finger when I pull it away.
Mixer tips
I mix my whole wheat dough (enough for two loaves) in my stand mixer with a dough hook for about 10 minutes on a medium speed. This is about 2 on a Kitchen Aid and if they knew this they would shudder, as 10 minutes is not recommended in their owner's manual. One way to get around this, and save wear and tear on your mixer, is once the dough is together, stop mixing, pull the dough out of the mixer and divide it in half. Let half rest while you mix the other half for the full time, then reverse the halves. When you're done, knead them briefly together before proceeding.
You must knead bread dough until it is smooth, no little cracked areas along the edges of the dough when you form it into a ball. If you don't do this, you can still bake and eat your bread, but it won't have that fabulous texture I was talking about. It may not rise as high as it could and it will get cakey after a day or two.
Whole Wheat Bread--The Recipe
The Sponge
4 1/2 teaspoons active dry yeast
3/4 cup warm water
1 cup whole wheat flour
The Dough
1 1/2 cups warm water
4 1/2 cups whole wheat flour
1/2 cup gluten flour
2 1/2 tablespoons vegetable oil*
1/3 cup honey
1 tablespoon salt
The Egg Wash
1 egg
1 tablespoon water
*Recently I have been replacing all of the oil with 1/2 cup flax seed meal. It's a nice way to get that very nutritious grain into our diet easily and enjoyably.
First the sponge

In your mixing bowl place the 3/4 cup of warm water and sprinkle the 4 1/2 teaspoons of active dry yeast (if you prefer to buy the packets, use two for this recipe) onto it. Then add the 1 cup of whole wheat flour. Stir them together vigorously. Then cover the bowl with plastic and let it sit for 45 minutes to an hour (see, this wasn't so hard).
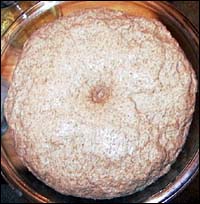
You will notice, when you peer into the bowl, that a lot of bubbling and expanding has taken place. It will reach a peak of expansion and then settle back down a little. That's when it's time to move onto the next step.
When your sponge is ready, uncover the bowl and add the 1 1/2 cups of warm water and 2 cups of whole wheat flour (that's right, not all 4 1/2 cups of it). Stir this in very well.
Next, the dough
Yeast can be a little sensitive. Sweet things cause it to go into overdrive and salt and oils shut it down. Before you add the remaining ingredients to the sponge temper the mixture with flour to protect the yeast a little. Otherwise you risk reducing the yeast activity and adversely affecting your final bread.
Now add the 1/2 cup vital wheat gluten, 2 1/2 tablespoons vegetable oil, 1/3 cup honey and 1 tablespoon salt. Mix these in well. Now start adding the remaining flour about 1/2 cup at a time.
On to kneading
By the time you have 4 cups total of flour, you will have a stiff dough. Now you should put in your dough hook, or put your bread on a board to knead. Use additional small amounts (like 1 tablespoon) as they are needed to keep the dough from sticking. Test the dough for stickiness in the mixer. Looking at it won't tell you enough.
Keep working the dough as long as possible, 10 minutes in the mixer. If you are kneading by hand, you're looking at 20-30 minutes. Take a break about 10-15 minutes into it and let the dough rest for 10 minutes. You will find it relaxed and easier to work then.
When you think you've had enough, draw the dough into a ball by cupping your fingers around the ball of dough and drawing the surface toward the back. Is it smooth all the way around? Or do some cracks appear around the edges? If you want it perfect, knead until the cracks go away. Take breaks if you need to. Or just move to the next step. It will still taste good and will be a starting point for you to improve upon.
The first rise

Place this dough into a large greased bowl (preferably not metal) and cover with plastic. Leave the dough to rise in a warm place for 1 to 1 1/2 hours until it doubles in size.
So what's a warm place? My house is kept rather cool, so I typically put my bread dough into the oven with the light on. Or leave it out on the counter and let it rise longer. Remember a cool rise for a longer period of time is a good thing when making bread.
When you think enough time has passed, pull the plastic back and make a big poke in the dough with a finger. Watch the hole. Did it fill up again right away? Did it fill up slowly? Or did it just sit there, a big hole, doing nothing? If the answer is either of the first two, it's not ready yet. Pull the plastic back over and go do something else for a while. Check it again later. If it's the last answer you're ready to shape the loaves.
Shaping the loaves
Shaping loaves has been a bit of a puzzle for me I've had to work it out on my own. Words cannot convey exactly what you do and pictures never seem to get at the critical bits of information. There are a couple of things you are trying to accomplish by shaping your dough that will make for a better loaf. One is getting all the air out. This kind of bread does not benefit from large air pockets. The peanut butter just squishes through them and it makes a big mess!
My first objective when I dump my now large puffy bread dough out onto the counter is to gently press all the air out of it. I'm not kneading it at this point because I don't want the relaxed dough to get stiff and elastic. That would make it difficult to shape. I ease all the air out and cut the dough in half.
The second thing I'm trying to accomplish is a high standing loaf with a perfect symmetrical mound coming out of the pan. The way I shape it will greatly affect this. I flatten each piece of dough out into a longish shape. At one end I begin to roll it up like a towel, although I'm very careful to pull the dough tight and not let any air spaces in. By pulling the dough towards me as I roll I create tension along the outside surface. This tension will improve the smooth outline of the finished loaf.
When I get to the end of the piece of dough, pulling the edge firmly I pinch the edge to the loaf. You actually pinch the dough along the seem and it will hold together. Don't tear the dough, but pinch firmly. At each end I shove the outside edge into the middle of the dough and grasp the remaining flaps and pinch them to the underside of the loaf. This takes some figuring out, but it has done wonders for making loaves with ends that don't sink down into the pan but rise up with the middle of the loaf.
The second rise
Place these into greased 9 X 5 pans. They will need to proof (another fancy word for rise) one last time. Cover them with plastic. This last rise will take an hour or less, again depending on how warm the room is. The dough should come at least an inch above the top of the pans before you put them in the oven. A finger poke is still a good option here to decide if the dough is really ready, but in this case you want the hole to fill in slightly. You need some good yeast action in the oven for a final push.
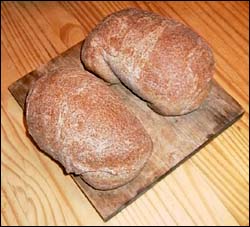
Turn your oven on to 350 degrees. While you're waiting for it to heat up, mix about a tablespoon of water with one egg and paint the top of your loaves when they are proofed. Then put them in the oven and bake for about 40 minutes.
To test for doneness, pull the loaf out of the pan and tap the bottom with a wooden handle. It should have a hollow sound. This takes a little experience but a loaf with no reverberation isn't quite done. Put it back for 5 minutes and check again.
Cool these for at least an hour before slicing. If you don't wait that long the structure of the bread will not support a knife and will mush down and stay permanently mushed when you're done mangling it. Try to be patient.
Murphy likes to bug bakers
There are a few things that can go wrong and all bread bakers are faced with variables that plague us. I'm guilty frequently of putting the loaves in the oven too soon. While the bread tastes fine and looks mostly OK, I get one side that is burst open. That's my signal that I didn't wait long enough for the final proof. I've never waited too long to put the loaf into the oven but if I had, my bread would likely be low risen and a little tough. The yeast just gave up before it got to the oven. Also, too much flour makes a low risen loaf that's rather dense. But trouble shooting bread problems is an article in itself.
Enjoy your bread, and remember you can make good bread at home, better bread than you ever dreamed--and bread that's very good for you.

